|
With both rear
fenders bonded in place, the decision was made to complete the rear body
to prime before working on the front fenders. The following photos show
the application of putty to get closer to the primer stage.
|
 |
This product is called
"Super Fine Glass" by Super48. It's mixed equally with
Evercoat's Metal Glaze Putty (a Polyester Finishing & Blending
Putty). |
|
Notice the repair on
the inner wheel-well? The roll bar used to pass through there. Since
we've settled down into "middle?-age", won't need a roll bar
for gentle Sunday afternoon drives in the country.  |

|
 |
Getting ever closer.
Photos do not seem capable of demonstrating the width of these new
fenders. You have to see the car in person.
Maybe once it's back on the
chassis with those massive wheels and tires it will be more obvious.  |
|
The raised
fiberglass piece that sits "behind" the rear bumper outer
wings had to be cut off the old fenders. This one is from the passenger
side. |

|
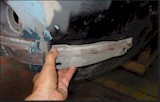 |
Because the mold for
the new fenders was taken off a race car that has no bumpers, there was
no provision for this piece. |
|
And here is the
driver's side with the section bonded on the new fender. |

|
|
The new exhaust
panel, (or lower rear valance as some people call it), fits exactly as
it should between the new fenders. |

|
 |
Hi-Build Prime has now
been sprayed across the rear body and roof. The doors are simply sitting
in place. Next we'll mount them properly to check for fit. |
|
It'll soon be time
to remove the old front fenders, lower valance and nose panel. |

|


